Mostrando entradas con la etiqueta Raspberry. Mostrar todas las entradas

domingo, 24 de enero de 2021

UPS for RASPBERRY

I will show you another improvement with a UPS for RASPBERRY with control of power parameters by Domoticz (Voltage, Current, Power and % of battery) that will allow us to have power in case of power failure and that can also power the USB HDD of the  previous article

I notice that there are several types of UPS, after testing a pair finally the one that is giving an optimal performance is:

https://www.waveshare.com/wiki/UPS_HAT

You can also control the electronic parameters of it and have the information passing it through scripts to Domoticz.


Finally, just add that there is another battery powered model for Raspberry that also incorporates RTC (Clock):

https://wiki.52pi.com/index.php/UPS_(With_RTC_%26_Coulometer)_For_Raspberry_Pi_SKU:_EP-0118

The drawback is that I only see usefulness for working with Raspberry in mobility projects since once the batteries are charged to 100% and the power supply is stable for a few hours, it cuts the battery charge and therefore the power supply to the Raspberry so it is not feasible for installations where we want to use said batteries as a UPS system for cases of sporadic power outages. Even so, there is the possibility of cutting the load daily for 5 minutes to force the circuit to never cut off the power supply and therefore the power to the Raspberry.


https://www.youtube.com/watch?v=SA00KE-7wHw&lc=UgxgZZvnrr_mTLmBy2R4AaABAg.960_c0UlAaj9IkCREuRLnI&feature=em-comments

domingo, 17 de enero de 2021

RaspberryPi + Domoticz + USB HDD to Solve SD life expectancy

After 5 years using Domoticz on a Raspberry in different homes, I have found that the SD cards with this type of server end up being corrupted, to avoid this problematic is common the generation of backups from time to time so when comes the day it stops working we can clone the SD from the image that we extracted in the last backup. 

As a solution to this problem we have the use of an HDD either mechanical or SSD, many of these have dropped in price then I have considered that it was a good improvement to the system,

Down I am attaching a link with which you can clone the SD to a HDD connected by USB, plus some points to keep in mind:


- The HDD must be externally powered so that when the Raspberry boots the HDD is already on to start the boot sequence, there are SATA cables with external power supply or USB HUBS with this feature as well.

- You must activate the option in the Raspberry to boot from USB and this is done by recording an SD for that matter.

https://www.makeuseof.com/tag/make-raspberry-pi-3-boot-usb/

In a next article I will show you another improvement with a UPS for RASPBERRY with control of power parameters by Domoticz (Voltage, Current, Power and % of battery) that will allow us to have power in case of power failure and that can also power the USB HDD as well.


P.D. - Maybe if after all the Raspberry not boot with the new HDD te next step is  to verify  PARTUUID for the root partition is correct in /boot/cmdline.txt and /etc/fstab and correct or disable UUID.

sábado, 22 de agosto de 2020

Control Consumo Router 4G Huawei con Domoticz

 Hoy os traigo los Script para lanzar a Domoticz los consumo de Datos de un HUAWEI, en mi caso es el HUAWEI 4G Router 3 Pro B535-235 , un router con magnificas calificaciones en varios Foros (Y por el momento también para mi..) , ideal ademas si tienes que hacer uso de antenas externas para mejorar la cobertura en zonas rurales.

Adelantar que para sistemas Windows hay Software de control y Gestion interesantes como:

https://routeur4g.fr/discussions/discussion/67/lteinspecteur-logiciel-de-surveillance-des-routeurs-4g-huawei

https://ltehmonitor.github.io/

Pero si queremos dejarlo todo integrado en la misma RaspBerry junto a Domoticz esta es la via...

Antes de todo tendremos que instalar la API de Huawei.

https://pypi.org/project/huawei-lte-api/

Una vez disponemos de la API ya es lanzar consultas y formatear los datos e inyectarlos a Domoticz, yo tengo 2 Scripts, uno de consumo Total y otro de Consumo de la Ultima hora (para notificaciones de exceso de trafico mediante Domoticz).

El Contador de Consumo Total se resetea según la programación que hayais hecho al rotuer via la APP de Huawei, yo lo tengo puesto al dia "1" del mes.

martes, 23 de abril de 2019

Mirubee / Wibeee y Domoticz , integrada lectura de Consumo en RED LOCAL

A diferencia del articulo anterior:

http://inphower.blogspot.com/2017/07/mirubee-y-domoticz-integrada-lectura-de.html

En esta versión recuperaremos datos de la Sonda Mirubee (Wibeee) en lugar de remotamente desde el cloud a directamente desde el dispositivo.

La forma de acceder a todos los datos es vía el portal WEB de dicha Sonda (Esto solo es recomendable en entornos LOCALES/VPN o nateando y securizando dicho Nateo).

Basandonos en el manual del fabricante Wibeee y buscando la pagina 35 tenemos:

http://docs.circutor.com/docs/M064B01-01.pdf

5.4.1.- CONSULTA DE PARÁMETROS 5.4.1.1.- ID del equipo Para ver la id del equipo, se debe utilizar la siguiente petición:

 http://direccion_ip/services/user/devices.xml

5.4.1.2.- Valores de las variables del equipo 

Para visualizar los valores de todas las variables del equipo, utilizar la siguiente petición: 

http://direccion_ip/services/user/values.xml?id=dispositivo 

También es posible visualizar una variables en concreto, ver Tabla 11 con las variables disponibles. 

http://direccion_ip/services/user/values.xml?var=dispositivo.variable

Donde si ya conocemos la IP del WiBeee y suponiendo que el Id dispositivo sea el de fabrica WIBEEE podemos sacar directamente el dato de Watios de la Linea 1 en una respuesta XML (Linux Bash).

x@raspberrypi# curl --silent -X GET http://192.xxx.xx.xx/services/user/values.xml?var=WIBEEE.pac1

<?xml version="1.0" encoding="UTF-8"?>
<values><variable><id>pac1</id><value>165.08</value></variable></values>

Tenemos la tabla de datos a recuperar en la PAGINA 36 del documento indicado:

http://docs.circutor.com/docs/M064B01-01.pdf

Ahora simplemente es crear un CRON JOB para alimentar a DOMOTICZ con el dato:

https://github.com/inphower/wibee_domoticz/tree/main

Saludos!


viernes, 8 de julio de 2016

Solar Radiation Shield for Weather Station

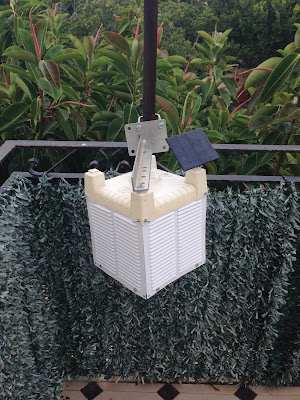
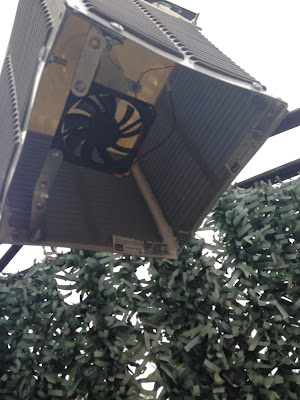
Buenas, tras varias quejas de los administradores de Meteoclimatic por temperaturas "dispares" comparadas con estaciones vecinas cuando incide el sol directamente sobre el Termometro/Higrometro de la estación meteorológica he procedido a montarme mi propio Radiation Shield Solar Autoventilado....


Unas rejillas de Leroy Merlin, una maceta exterior recortada, escuadras, silicona y un ventilador y placa solar de Aliexpress....


La versión comercial sin ventilación se va a los 50 Dolares!!!


Por ahora se nota un muy ligero retroceso en la temperatura en las horas solares.,.....


lunes, 30 de mayo de 2016

Raspberry Pi 3 = Weewx + Domoticz + Mochad (X10) + Rflink (Arduino 434 Mhz) + Broadlink Pro (IR+434/315mhz) + Fritz Dect 200

Bueno pues vamos ampliando el uso de la RaspberryPi, ahora con control domotico usando el Software Domoticz pudiendo mediante varias implementaciones actuar sobre cualquier equipo RF (434mhz o 315Mhz) o Infrarojos (IR) o X10 ... :D, ademas de poder monitorizar y almacenar y/o procesar las señales recibidas y clonarlas o emitir nuevas (Ej: Estaciones meteorológicas, Sensores de alarma, Mandos Via Radio...)

Manejo de Interruptores varias tecnologías..


 Control de temperaturas.


 Control de consumos, velocidades, almacenamientos.


 RFLINK (Modulo Externo Arduino Mega + modulo RF..) lecturas de tramadas RF 434 Mhz desconocidas (para asignar si son conocidas) .... ya lleva casi 800!!!

http://www.nemcon.nl/blog2/


 Representación gráfica de consumos.


 Generación de eventos en una programación sencilla gráfica basados en circunstancias varias... al salir de casa desconectar varios equipos....


 Ej: Auto desarmado al llegar a casa y conectarse el móvil al Wifi...tb valido para informar mediante notificaciones (Email... Push..) cuando alguien llega a casa...


viernes, 8 de abril de 2016

Migración servidor Estacion Meteorologica Playa de Gandia...PC --> Raspberry Pi 3


Alla por Noviembre de 2011 os contaba que me habia hecho con una Oregon WMRS200 y la habia instalado en el tejado con la intención de un uso personal (Es interesante conocer la dirección del viento y la intensidad se tu deporte se ve seriamente afectado por las rachas de viento.... ) y ya que estamos  transmitir datos hacia diversos portales meteorológicos de Internet (Meteoclimatic, Awekas, Weather Underground, PWSweather...), e incluso proporcionar datos a TeleSafor, por entonces disponía de un Pc portátil Thinkpad T42 a modo de servidor conectado las 24H del dia y esto simplemente supuso incluir un pequeño servicio más al mismo.

Ha fecha de hoy este Pc ya solo albergaba poco más que dicho Soft de la Estación Meteorológica ya que el uso principal que tenia era de servidor de descarga y almacenaje de ficheros y este se externalizo a un NAS Synology.


El resultado ha sido finalmente hacerse con una RaspBerry de la que tanta gente habla y montar sobre ella el Software WEEWX y tunear un plantilla muy chula!!!, asi que ahora en poco mas que el tamaño de una caja de tabaco y corriendo Raspbian (Es un Linux Debian) y su principal motivo que es su muy bajo consumo hemos montado el primer servicio para esta Estación Meteorológica y lo que tenga que venir en un futuro!!..... :D

http://meteo.inphower.org


viernes, 11 de marzo de 2016

Broadlink RM PRO + Android Bridge + Iphone (Jailbreak) + Siri = Voice commands!

Hello everyone, today I'll show how to control the BroadLink with voice commands from an iPhone with the vocal assistant Siri, due to the restrictions on Iphone we will use a android tv or a fixed mobile phone Android in the fixed at home as a bridge between the BroadLink and Iphone.

In the next video you can see the BroadLink and Android phone that bridges with Iphone.


These commands can be used also from the handsfree in the car for instance to open the garage when you arrive home. (Spanish Video)


DIY...

On the android device we need the Broadlink APP configured and a Bridge via HTTP request, for the bridge I use  Google Play RM PLUGIN, after we active te HTTP Bridge we can activate the applications using a http request.

☑ HTTP Bridge
This app acts as a HTTP Bridge and let you control your Broadlink devices via simple HTTP urls (a.k.a curl commands). API syntax are extremely user-friendly and well-documented right inside the app. It is now much easier to integrate RM device into your home automation setup.

After that with a Iphone with Jailbreak and:

- Cydia assistant+
- Activator & Plugin  Activate command (or Activate Link)

Example using Activate Command Line with speaking feedback:

siriSay "Executing xxx" && curl -s -S --connect-timeout 3 'http://example.com:port/send?deviceMac=xxxxxxxxx&codeId=xx' | grep successfully > /private/var/tmp/auto.log && siriSay "Executed" || siriSay "Fail"

Thats all!!!


domingo, 6 de marzo de 2016

Broadlink RM PRO + Old Android Phone (S2) Android 4.4 + Google Now Launcher + TASKER APP + AUTOVOICE & RM (Tasker Plugins) = OK GOOGLE

Control IR + RF devices with your voice using  OK GOOGLE.

Bueno, lo dicho, después de presentaros el BroadLink RM PRO ( http://inphower.blogspot.com.es/2016/02/broadlink-rm2.html ) aquí os dejo un video de como se puede conseguir integrarlo con comandos de Voz en un Android con Google Now "Ok Google"...

En breve os mostrare como integrar el Broadlink RM PRO con Iphone y Siri!!!


Twitter Inphower